Friday, February 14, 2025

How to reserve into a parking space like a pro

Step1: Find a good parking spot and flip on your turn signal

Step2: drive 2 spots past the spot where you want to park

Line up your rearview mirror with the third parking line (counting from your target spot).

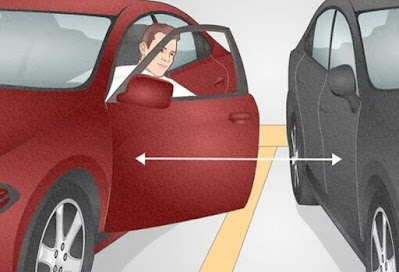
Distance from parked cars: Keep less than 1 foot (0.30m) away


Step3: Turn your wheel in the direction of the spot until it locks

1. Shift into reverse and turn the wheel fully in the direction of the parking space.

Right-side spot? Turn fully right.

Left-side spot? Turn fully left.

2. This method eliminates guesswork, ensuring a precise and consistent turn every time.


Step4: Turn your head to see where you are going as you reverse.

1. Check all directions, even if using a backup camera.

2. Turn around and look in the direction your car is moving.

3. Adjust if needed:

If too close to another car, stop.

Pull forward slightly and turn the wheel slightly away from the spot.

4. Rely on your own vision, especially during driving tests where backup cameras may not be allowed.


Step5: Straighten your wheel to finish backing into the spot.
1. Reverse slowly and watch your rear bumper.

2. Begin straightening the steering wheel once the rear bumper is about halfway into the spot.

3. Continue until your rear tires are parallel with the parking lines.


Step6: Move straight back to the end of the spot.


Step7: Check your space and adjust as needed.


How to Parallel Park Your Car in Four Simple Steps

First, find a safe and legal parking space, starting with wider spots if you're a new driver. Check for parking signs, restrictions, and obstacles like open gutters or rocks. Ensure the space is at least 3-4 feet longer than your car or about 1.5 times its length for easy parking.

Follow these four simple steps to parallel park your car effortlessly.

Step1: Position your car

Position your car parallel to the parked vehicle in front of the available space, maintaining at least one arm’s distance but no more than half your car’s width. Align either your rear wheels with the back of the parked car or your mirrors with the adjacent car’s mirrors for better visibility. If space allows, positioning your rear tires slightly beyond the parked car’s rear can also work.


Step2: reversing in

Lock the steering to the extreme left, engage reverse, check mirrors, and start backing up. Keep an eye on the car behind through the IRVM and the front car’s rear. Look over your shoulder for better visibility. Reverse until your front wheels align with the rear of the front car, using the ORVM to monitor spacing. If using a reverse camera, follow the dynamic guidelines while also judging spacing manually.


Step3: straighten up and turn the car back in.

Straighten the steering and continue reversing as your car nears the pavement and rear parked car. Use the passenger-side ORVM to monitor surroundings. Once the front clears the parked car, turn the steering in the opposite direction while ensuring enough space at the front and rear. Use parking sensors and the reverse camera for guidance but rely on visual judgment for precise maneuvering.


Step4: The final alignment of the car

Once in the parking space, straighten the steering and adjust as needed. Align with the front car’s license plate or check the ORVMs for proper positioning. Look over your shoulder and adjust mirrors for a final space check.


Wednesday, January 15, 2025

"How to Start and Stop a Car on a Slope with Manual Transmission"

For manual transmission, here’s how to start and drive on a slope (including bridges):

To stop on uphill:

To stop on an uphill, press the clutch and brake pedals, and you can also engage the handbrake.

Hill Start (Uphill):

Press the Clutch: Fully depress the clutch pedal and shift into first gear.

Engage the Handbrake: Keep the handbrake on to prevent rolling back.

Accelerate Slightly: Gently press the accelerator to increase engine revs.

Find the Biting Point: Slowly release the clutch until you feel the car trying to move forward.

Release the Handbrake: Once you reach the biting point, release the handbrake and gradually release the clutch while increasing throttle to move forward.

Also, we can hradually release the clutch, then release the brake while pressing the accelerator, without using the handbrake.

Going Downhill:

Shift to Lower Gear: Before descending, shift to a lower gear (2nd or 1st) to use engine braking.

Release the Accelerator: Let the car slow down by releasing the accelerator and allowing engine resistance to control speed.

Avoid Using Brakes Too Much: Rely on engine braking as much as possible to prevent overheating the brakes.


About Car simulator driving learning

Car simulator learning is a useful tool for beginners to practice driving skills in a safe, controlled environment.

It allows learners to get familiar with vehicle controls, road signs, traffic rules, and basic maneuvers without the risk of real-world accidents. 

Simulators provide valuable experience in handling various road conditions, weather scenarios, and emergency situations, helping build confidence and competence before actual driving.


Sunday, January 12, 2025

Pre Driving Checks

Pre Driving Checks / Pre Driving Preparations

Bare minimum checks:

  1. Adjust seat and mirrors
  2. Wear seat belt
  3. Check for neutral gear
  4. Check for hand brake engagement
  5. Start the engine
  6. Check for any warning indicator

Subsequent checks in details:

Sitting position:
In the driver seat, you should have a comfortable posture to have easy access of all the vehicle controls. You should have a good view of the road around the vehicle

Sitting Posture:
  • Ensure comfortable sitting posture with firm lumbar support from the seat’s back. 100 to 110 degree is suitable.
  • Hands at the steering wheel, elbows should be slightly bent.
  • Do not sit erect or slouch on the seat.
  • Do not ride on the steering wheel.


Clothes:
  • Clothes worn by the driver should be comfortable with the movement.
  • Clothes should not be very loose or tight so as to hamper free movement of the hands or feet.


Shoes
  • Always wear comfortable shoes while driving to avoid inconvenience and distraction.
  • Never drive with high heels or wothout shoes.

Seat adjustment:
Adjust seat slider while holding the steering wheel at 12 O'clock position, stop at a position where you get nice firm lumber support.

On pushing break pedal harder you should get sunk on seat.

Head rest adjustment:
Head rest is not a resting place for your head but is a head movement restraint in the event of a collision of your car from rear. Adjust the height of the head rest so that your head and restraint lie in one straight line.


Seat belt
A car seat belt is a safety device that secures passengers, reduces injury risk during crashes, and prevents ejection. It distributes impact forces across the body and comes in types like lap belts, three-point belts, and harnesses.

Wear the seat belt across your pelvis and chest:
  1. Lap belt: Position it snugly across your hips, not your stomach.
  2. Shoulder belt: Place it across your chest and collarbone, avoiding your neck.


Tilt steering
Tilt steering is a feature that allows drivers to adjust the height of the steering wheel to make driving more comfortable

When children are there in the car
Do not wear safety belt around infant or child
Do not allow children to stand between panel and seat.

Infant seats;
Pets
Coolant level:
  • Should be within upper and lower marks
  • Loss of coolant may cause engine seizure
  • Never open radiator cap when hot
  • Should be topped up with distilled water.


Battery electrolyte
Should be within upper and lower limit.
Top up only with distilled water.


Windshield washer liquid level

Always keep it at full level.
A dirty windshield will affect your vision at night time.

Break fluid:
Break fluid level to be with minimum and maximum level. Needs to be replaced in every two years or 20000 kms which ever occurs earlier.


Engine oil
Envine oil to be maintained within upper and lower mark hole.
To be replaced every 10000 kms or one year which occurs earlier.

Around the vehicle
  • Lookout for children, pet animals as they may not be visible in blind spots.
  • Check for proper tyre pressure
  • Resistration plate should be intact.
  • Look for any fluid leakage in under chassis.
  • Check for any broken or fused lamps and its cleanliness


Mirror adjustments:
Mirror Adjustments: ORVM, IRVM, and Blind Spot

1. IRVM (Interior Rearview Mirror): Adjust to see the entire rear window directly.

2. ORVM (Outer Rearview Mirrors):

Driver's Side: Lean left; adjust to barely see the car's edge and maximize road view.

Passenger's Side: Lean right; adjust similarly for maximum coverage.

3. Blind Spot: Use blind-spot mirrors or advanced systems to cover areas not visible in ORVMs.

This setup ensures optimal visibility and minimizes blind spots for safer driving.


Check following items functionally
  • Gear lever
  • Parking brake
  • Accelerator pedal
  • Break
  • Clutch
Wiper blade
Check condition of wiper blades particularly during the monsoon.
Edge should not be broken or cut.

Tool kit and emergency materials
A car toolkit and emergency materials should include:
  • 1. First Aid Kit - Bandages, antiseptic, pain relievers, and other basic medical supplies.
  • 2. Spare Tire & Jack - For flat tire replacement.
  • 3. Jumper Cables - For dead battery issues.
  • 4. Flashlight - With extra batteries, for low-light situations.
  • 5. Tire Pressure Gauge - To check tire inflation.
  • 6. Multi-tool/Tool Kit - For small repairs.
  • 7. Flares/Reflective Triangles - To signal distress.
  • 8. Emergency Blanket - For warmth in case of breakdowns in cold weather.
  • 9. Water and Non-Perishable Snacks - For survival in case of long waits.
  • 10. Car Manual - For specific car troubleshooting.
  • 11. Tow Rope - In case the car needs to be towed.
  • 12. Fire Extinguisher - For fire emergencies.
Check all indicator lamps
Check all indicator if all bulbs are ok. After engine is started , no indicator should come or come in.


Mental and physical condition
Driving under the influence of alcohol, drugs, or sleeping medications, or when angry or distracted, impairs judgment, coordination, and reaction times. It’s important to drive only when sober, calm, and fully alert to ensure safety on the road.

Loose items
  • There should not be any loose items on panel and around console 
  • There should not be any round object like bottle which can roll under pedala.


Saturday, January 11, 2025

How to control car on speed breaker | fundamental rule for changing gears

 The fundamental rule for changing gears is "brakes to slow, gears to go." Shift up through the gears as the car gains speed. Use the foot brake to slow down, and only shift to a lower gear when you need the accelerator to drive again.

How to Control a Car on Speed Breakers: Fundamental Gear Changing Rules

Speed breakers require careful handling to ensure both safety and comfort. Here's a step-by-step guide to managing your car effectively over speed breakers while adhering to fundamental gear-changing rules:

1. Approach with Reduced Speed

Always slow down well before reaching a speed breaker. Use the foot brake gently to decrease speed and avoid sudden braking. The aim is to approach at a speed that allows you to cross the bump smoothly without excessive jolts.

2. Shift to a Lower Gear

Before reaching the speed breaker, downshift to a lower gear, typically the first or second gear, depending on the height of the bump and your car's speed. Lower gears provide better control and more pulling power, which is essential for smoothly crossing speed breakers.

3. Maintain Steady Control

While crossing the speed breaker, maintain a consistent speed. Avoid using the clutch excessively, as it can lead to unnecessary wear. Keep your foot lightly on the accelerator to ensure the car doesn’t stall.

4. Accelerate Gradually After Crossing

Once the car has passed the speed breaker, gradually accelerate and shift to higher gears as the car gains speed. Avoid abrupt acceleration to maintain control and comfort.

Key Gear-Shifting Rule:

"Brakes to slow, gears to go": Use the brakes to reduce speed before the bump and downshift to lower gears only when you need the accelerator to regain momentum.

Pro Tips:

  • Maintain a safe distance from the vehicle ahead to allow enough reaction time.
  • Avoid crossing speed breakers diagonally, as it can unbalance the car and damage the suspension.
  • In manual cars, avoid riding the clutch while crossing speed breakers to reduce wear.

By following these steps, you can navigate speed breakers efficiently while preserving your car's performance and ensuring a smoother ride.

Palming method for changing the Gear

Palming method

To operate the gear lever we use a method known as ‘palming’. You can practice this when the car is stationary and the engine is switched off, but make sure that you keep the clutch pedal pressed down to the floor. 

 Neutral

The gear lever will automatically spring to the central neutral position when not in a gear. This is very useful when trying to find and select third or fourth gear.


First gear

To select first gear place your left hand onto the gear lever, palm away from you. Cup your hand around the gear lever and move it across to the left and forward.


Second gear

To move from first to second gear keep your hand on the gear lever, palm away from you, apply slight pressure to the left to stop the gear lever springing back to the central neutral position, and move the gear lever straight back.


Third gear

Now move your hand so that your palm is facing you, cupping the gear lever. Move the gear lever forward, allow it to spring into the central neutral position then move it forward to select third gear.


Fourth gear

Keeping your hand in the same position, move the gear lever straight back to select fourth gear.


Fifth gear

To select fifth gear keep your hand in the same position and move the gear lever forwards, across to the right against the neutral spring and forwards.


How to reserve into a parking space like a pro

Step1: Find a good parking spot and flip on your turn signal Step2: drive 2 spots past the spot where you want to park Line up your rearview...